How to Build Your Dream Basketball Gym: Step‑by‑Step Plan
Imagine walking into a space where the scent of fresh linoleum meets the echo of a perfectly timed bounce. Building your dream basketball gym isn’t just about slapping a hoop in a garage; it’s a blend of design, budgeting, and a dash of sports‑science know‑how. This guide walks you through each phase, from sketching the layout to opening night, so you can create a facility that feels professional yet personal.
Planning the Space and Layout
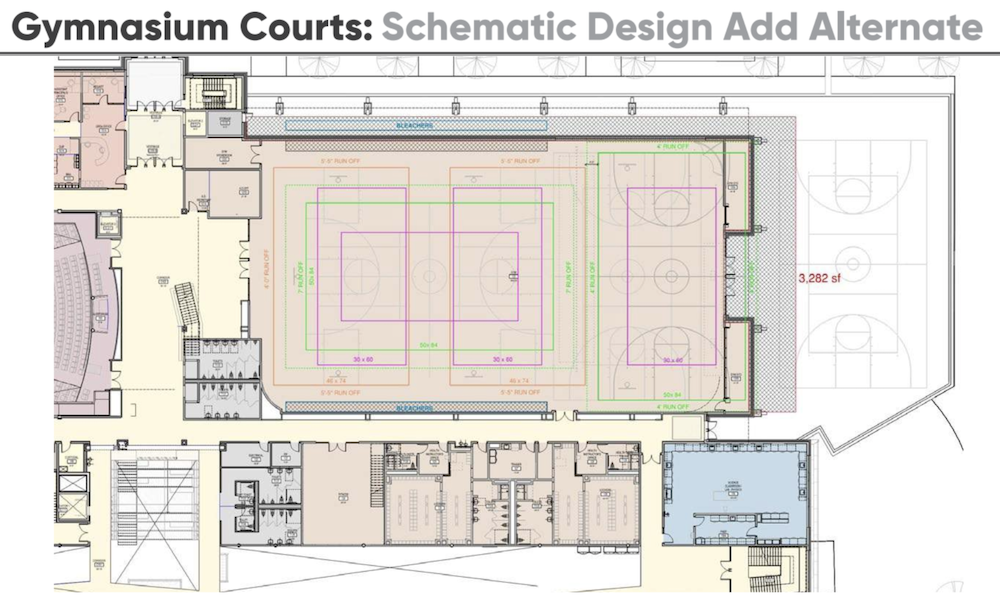
The first decision is where the gym will live. A detached garage, a basement, or an addition to an existing structure all have pros and cons. Measure the square footage carefully—regulation courts need at least 94 by 50 feet, but many community gyms thrive in a half‑court setup of 50 by 30 feet. Sketch a floor plan that leaves room for bleachers, a scoreboard, and a small locker area. Remember, clear sightlines are crucial; avoid placing support beams directly in the playing zone.
Budgeting and Financing
Money talks, and a realistic budget keeps the project from stalling. Break costs into three buckets: construction (walls, roof, insulation), interior finish (flooring, paint, lighting), and equipment (hoops, nets, scoreboards). A modest half‑court renovation can run from $30,000 to $50,000, while a full‑size pro‑level build may climb past $150,000. Explore financing options early—home equity lines, sports‑facility grants, or even a community crowdfunding campaign can ease the strain.
Selecting the Right Flooring and Equipment
The floor is the heart of any basketball space. Professional venues favor maple hardwood for its bounce, but for a home or community gym, high‑grade synthetic wood or modular sport tiles provide durability and easier maintenance. Look for a surface with a 1‑2 inch “give” to reduce joint stress. When it comes to hoops, a portable, adjustable‑height system offers flexibility, while a fixed, backboard‑mounted unit delivers a more authentic feel. Don’t forget quality nets, a digital scoreboard, and a sturdy basketball rack.
Lighting, Acoustics, and Ventilation
Good lighting isn’t just about brightness; it’s about uniformity. Aim for 50‑70 foot‑candles on the court, using LED panels that minimize glare and cut energy costs. Acoustic panels on the walls and ceiling can tame echo, especially in smaller gyms where the ball’s thud can become overwhelming. Finally, a fresh air system—ideally a combination of HVAC and ceiling fans—keeps temperatures comfortable and prevents condensation on the floor.
Safety and Accessibility
Compliance with local building codes and the Americans with Disabilities Act (ADA) isn’t optional—it protects users and keeps you out of legal trouble. Install non‑slip flooring around the perimeter, cushioned padding on the walls, and clear signage for emergency exits. Provide at least one wheelchair‑accessible entrance and a ramped pathway to the locker room. Safety nets or protective glass behind the backboard can also prevent stray balls from causing damage.
Timeline and Project Management
Even the best‑drawn plan can derail without a realistic schedule. Break the project into phases: demolition (if needed), structural work, flooring installation, equipment setup, and final inspections. Allocate buffer weeks for unforeseen delays—weather, material backorders, or permit holdups are common. Using a simple Gantt chart or project‑management app helps you track milestones and keep contractors accountable.
Adding Personal Touches
While functionality is king, personality makes the gym memorable. Paint a feature wall with your team’s colors, install a mural of a legendary player, or hang framed memorabilia. A small lounge area with a mini‑fridge and a TV can turn the space into a social hub, encouraging players to linger after practice.
Maintaining the Facility
Once the doors open, regular upkeep preserves the investment. Schedule monthly floor inspections, tighten bolts on the hoops, and clean the lighting fixtures to maintain brightness. Set up a maintenance log so you can track repairs and budget for future upgrades—like adding a shooting machine or upgrading to a glass backboard.
When to Call in Professionals
Some tasks are best left to specialists. Structural engineers should review any major load‑bearing changes, while licensed electricians handle the lighting and scoreboard wiring. If you’re unsure about ventilation calculations or ADA compliance, a consulting firm can save you headaches—and money—in the long run.
Final Thoughts
Creating a basketball gym that feels both elite and welcoming is a rewarding challenge. By mapping out space, securing financing, choosing the right materials, and staying vigilant on safety, you lay a foundation that will serve athletes for years. Take each step deliberately, and soon you’ll hear the satisfying swish of nets in a space you built from the ground up.
FAQ
- What floor type is best for a home basketball gym? Generally, high‑grade synthetic wood or modular sport tiles strike the right balance between performance and maintenance, especially when maple hardwood is cost‑prohibitive.
- Do I need a permit to install a basketball court? Most municipalities require a building permit for structural changes and electrical work, so check with your local planning department before breaking ground.
- How much space is needed for a half‑court? A comfortable half‑court typically measures around 50 by 30 feet, plus an additional 5‑10 feet around the perimeter for run‑off and safety zones.
- Can I make the gym wheelchair‑accessible without major renovations? Yes—install at least one ramped entry, ensure door widths of 32 inches or more, and provide accessible restrooms and locker spaces to meet ADA standards.