Load Hatch Patterns in AutoCAD 2020: A Simple Guide
If you have ever struggled to find a specific hatch pattern in AutoCAD, you are not alone. The default library is extensive, but sometimes the pattern you need isn't quite right, or it’s missing entirely. In AutoCAD 2020, the ability to load custom hatch patterns gives you the freedom to match industry standards or create unique visual elements for your drawings. It’s a process that feels daunting at first but becomes second nature once you understand the file structure and command mechanics.
Hatch patterns are essentially filled regions in a drawing. They represent materials, terrain, shadows, or structural elements. While AutoCAD comes with hundreds of pre-installed patterns, professional workflows often require custom patterns defined in .pat files. Whether you need a specific geological symbol or a proprietary corporate texture, knowing how to load these external patterns is a crucial skill for any drafter. This guide walks you through the process without the technical fluff, focusing on what actually works in the 2020 version.
Understanding the Hatch Pattern File Structure
Before diving into the commands, it helps to know where AutoCAD looks for these patterns. The software relies on text-based files with a .pat extension. These files contain mathematical definitions that tell the program how to draw the lines and spaces between them. By default, AutoCAD searches a few specific directories, but when you add a custom file, you need to ensure it’s in a place the software can find it.
The most common location for user-defined patterns is the Support folder within your AutoCAD installation directory. However, you can store them anywhere as long as you point AutoCAD to the right place. If you are working in a team, it’s often best to save custom patterns in a shared network drive and add that path to the support file search paths. This ensures everyone in the office has access to the same materials library without redistributing files constantly.
Step-by-Step: Loading a Custom Hatch Pattern
There are two primary ways to load a hatch pattern: through the ribbon interface and via the command line. The command line is generally faster and more reliable for troubleshooting, so we’ll start there.
- Open the Hatch Command: Type
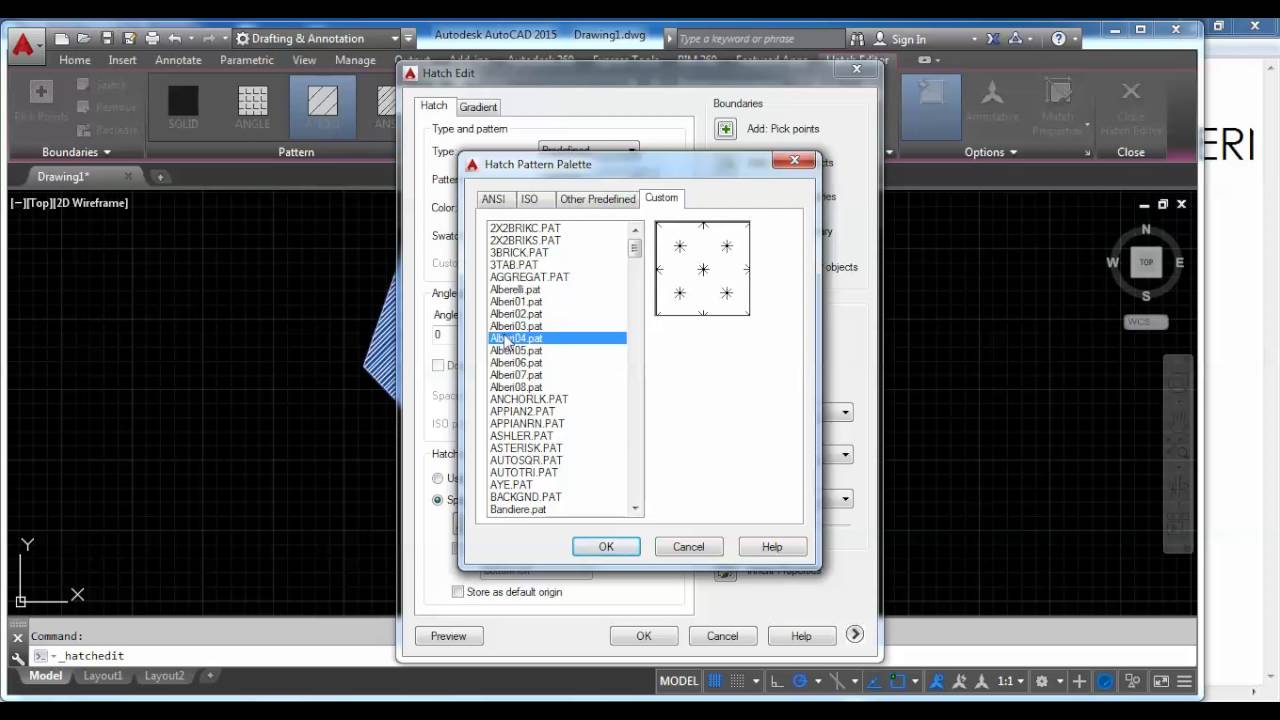
HATCHorHand press Enter. Alternatively, click the Hatch icon in the Draw panel. - Select the Pattern: In the Properties panel, click the pattern selector (usually labeled "Solid" or showing a preview of the current pattern). This opens the Pattern Palettes window.
- Navigate to User-Defined: In the left pane of the Pattern Palettes, you will see categories like Architectural, ANSI, and ISO. Expand the "User-Defined" or "Custom" section. If your new pattern doesn’t appear here, it means AutoCAD hasn’t recognized it yet.
- Check the Support Paths: If the pattern is missing, go to the Application Menu (the big 'A' icon) > Options > Files tab. Under "Support File Search Path," click "Add" and browse to the folder containing your
.patfile. Click OK to save. - Reload the Palette: Close the Pattern Palettes window and reopen the Hatch command. Your custom pattern should now be listed under the User-Defined section.
Once loaded, selecting the pattern updates the preview in your drawing area. You can then adjust the scale and angle to fit your needs. Remember, the scale value affects the size of the pattern relative to your drawing units. A value of 1 usually means the pattern is drawn at full size from the definition file.
Troubleshooting Common Loading Issues
Even with the correct steps, things can go wrong. One frequent issue is the "pattern not found" error, even after adding the support path. This often happens because the .pat file contains syntax errors. These files are plain text, so they are sensitive to spacing and line breaks. If you created the pattern yourself, ensure there are no hidden characters or mismatched commas.
Another common problem is compatibility. AutoCAD 2020 supports both classic vector (*.pat) and high-definition (*.pat or .hp) patterns. If you are trying to load a pattern from a very old version of AutoCAD, it might not render correctly in 2020. In such cases, opening the .pat file in a notepad and checking for obsolete commands can help, or simply recreating the pattern in AutoCAD’s own editor is a faster solution.
Creating Your Own Hatch Patterns
If you can’t find the pattern you need, you can create one from scratch. AutoCAD provides a dedicated editor for this purpose. Type PATTERNEDITOR to launch the tool. This interface allows you to draw geometric elements within a defined boundary. The software then repeats these elements across the hatch area.
When designing a custom pattern, keep it simple. Overly complex vectors can slow down your drawing’s regeneration time, especially in large plans. Focus on the essential lines that define the material’s appearance. For example, a brick pattern needs only the outline of a few bricks and the mortar joints. The repeating nature of the hatch command does the rest.
Save your creation with a descriptive name in your designated support folder. Once saved, it behaves exactly like any other built-in pattern. You can share this .pat file with colleagues or archive it for future projects. Over time, building a library of custom hatches saves significant time on repetitive detailing tasks.
Best Practices for Managing Hatches
As your library of custom patterns grows, organization becomes key. Store your .pat files in a logical hierarchy, perhaps by material type or project standard. Avoid scattering them across different drives, which can lead to broken links when moving projects between computers.
Also, consider using layer standards for your hatches. Placing custom hatches on their own dedicated layer with a thin lineweight ensures they don’t overpower other drawing elements. This approach makes it easier to turn them off for plotting or editing without affecting the rest of the design. Consistency in how you apply and manage these patterns elevates the professionalism of your final output.
FAQ
Where does AutoCAD 2020 look for hatch pattern files by default?
AutoCAD searches the main Support folder, the Program folder, and any custom paths added in the Options dialog under the Files tab. It also checks your current drawing’s folder if "Add current drawing's path to the support file search path" is enabled.
Can I edit an existing hatch pattern directly?
Yes. Right-click a pattern in the pattern palette and select "Edit" to open the Pattern Editor. Alternatively, use the PATTERNEDITOR command. Changes made here will update the definition for any future hatches using that pattern, so be cautious.
Why does my custom hatch look distorted or scaled incorrectly?
This usually indicates a mismatch between the pattern definition units and your drawing units. Check the global scale factor in the hatch properties. If the pattern was created in inches but your drawing is in meters, a significant scale adjustment is required to normalize the appearance.
Do custom hatch patterns increase file size?
Minimal. The .pat file itself is small text data. However, complex vector hatches applied over large areas can increase the overall drawing file size and slow down performance. For very large areas, consider using gradient fills or raster images instead, or simplify the vector definition.