How to Enable Virtualization on Gigabyte Motherboards
Virtualization is the secret sauce behind running multiple operating systems on a single PC, testing software safely, or squeezing extra performance out of a modern CPU. If you own a Gigabyte board, the process is usually straightforward, but a few quirks can trip up even seasoned builders. This guide walks you through the steps, from spotting the right BIOS option to verifying that everything works once you’re done.
Why Turn On Virtualization?
Before diving into the BIOS, it helps to know what you gain:
- Dual‑boot flexibility: Run Windows and Linux side‑by‑side without a second machine.
- Developer tools: Hyper‑V, VMware, and VirtualBox need hardware‑assisted virtualization for smooth performance.
- Security features: Windows Core Isolation and certain anti‑malware solutions rely on VT‑x/AMD‑V.
All of those rely on a single BIOS toggle—typically labeled “Intel Virtualization Technology,” “AMD-V,” or simply “SVM Mode.”
Preparing Your System
Give the motherboard a quick visual check first. Some older Gigabyte models hide the virtualization switch under an “Advanced” submenu, while newer UEFI firmware places it in a more obvious “Peripherals” or “CPU Features” section.
Things to do before you reboot:
- Save any work; a BIOS entry will restart the computer.
- Make sure you have a recent BIOS version. Gigabyte’s Support page offers simple guides for flashing if needed.
- Note whether your CPU is Intel or AMD—different wording in the menu will appear.
Step‑by‑Step: Enabling the Feature
1. Enter the BIOS/UEFI
Power on (or restart) the PC and repeatedly tap the Delete key. On some models the F2 key works as well. You’ll land on the “BIOS” splash screen, then the main UEFI interface.
2. Locate the Virtualization Setting
The exact path varies, but the typical route looks like one of these:
- Advanced → CPU Configuration → Intel Virtualization Technology (for Intel CPUs)
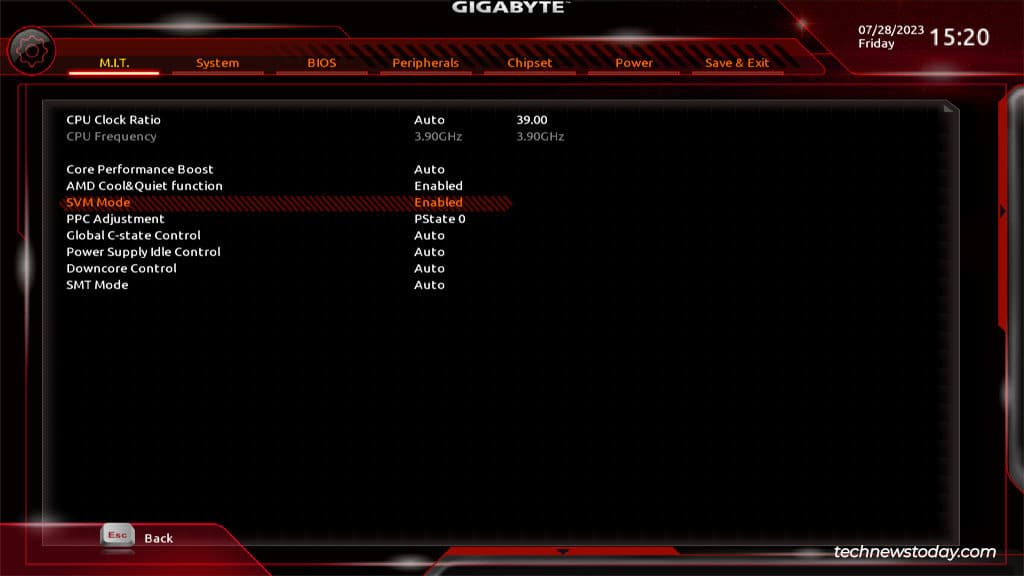
- Advanced → CPU Configuration → SVM Mode (for AMD CPUs)
- Peripherals → CPU Features → Virtualization (on newer UEFI versions)
If you cannot find it, try the built‑in search function—most Gigabyte UEFI builds have a small magnifying glass in the corner.
3. Switch It On
Select the option and change the value from Disabled to Enabled. Some boards also let you toggle “VT‑d” (Intel’s directed I/O) or “IOMMU” (AMD’s equivalent) in the same menu. Turn those on only if you need pass‑through of PCIe devices to a VM; otherwise stick with the basic virtualization flag.
4. Save and Exit
Press F10 (or click “Save & Exit”) and confirm. The system will reboot, now with hardware virtualization active.
Confirming That It Worked
Once Windows or Linux boots, a quick check will tell you if the setting stuck:
- Windows: Open Task Manager → Performance tab → select CPU. You should see “Virtualization: Enabled.”
- Linux: Run
lscpu | grep Virtualizationin a terminal; it will list “VT-x” or “AMD‑V” if the feature is live.
If you see “Disabled,” revisit the BIOS—sometimes a “Quick Boot” option can skip the new settings, or a motherboard may have a hidden “Secure Boot” lock that resets certain flags.
Common Hiccups and How to Fix Them
Even with the steps above, a few snags pop up more often than you’d expect:
- BIOS Reset after Power Loss: Some Gigabyte boards revert to defaults after a sudden outage. Check the “Save BIOS Settings” toggle in the “BIOS Features” menu.
- Conflicting Hyper‑V Settings: Windows may disable VT‑x if “Hyper‑V” is turned off in “Turn Windows features on or off.” Ensure both are aligned.
- Legacy BIOS vs. UEFI: Older boards might still run in Legacy mode, where the virtualization flag appears under “Chipset” instead of “CPU Configuration.”
When to Update the BIOS
If the option is missing entirely, a BIOS update is often the answer. Gigabyte releases firmware patches that add support for newer CPUs and sometimes reveal hidden settings. Before flashing:
- Download the exact file for your exact motherboard model (e.g., GA‑Z490‑AORUS‑ELITE).
- Use the built‑in Q‑Flash utility; it works from within the BIOS, so you don’t need a bootable USB.
- Back up the current BIOS version—Q‑Flash lets you save it to a USB drive just in case.
Beyond the Basics: Leveraging Virtualization Features
Now that the gate is open, you might explore:
- Enabling “Intel VT‑d” or “AMD IOMMU” for GPU pass‑through in a gaming VM.
- Setting up a “Hyper‑V” virtual switch for isolated network testing.
- Using “Nested Virtualization” if you plan to run a hypervisor inside another VM—note that not all Gigabyte chips support this reliably.
These advanced tweaks often involve additional BIOS flags, so keep a notebook handy.
Quick Recap
- Enter BIOS with Delete/F2.
- Find the virtualization toggle (usually under Advanced → CPU Configuration).
- Enable it, save, and reboot.
- Verify in OS (Task Manager or
lscpu). - Troubleshoot by checking BIOS reset options or updating firmware.
With those steps, your Gigabyte motherboard should now be ready to run virtual machines like a pro. Happy testing!

![[GIGABYTE] How To Enable Virtualization on Gigabyte Motherboards - YouTube](https://i.ytimg.com/vi/FCUSboSZI94/maxresdefault.jpg)