How to Seamlessly Connect PayPal with Flutter Apps
Bringing PayPal payments into a Flutter project can feel like navigating a maze of APIs, platform channels, and security concerns. Fortunately, a clear roadmap exists that lets you focus on user experience instead of low‑level plumbing. In this guide we’ll walk through everything you need for a robust Flutter PayPal integration, from setting up credentials to handling callbacks and testing on both Android and iOS.
Why integrate PayPal in Flutter?
PayPal remains one of the most trusted online payment methods worldwide, and its brand recognition can boost conversion rates for any mobile app. With Flutter’s single‑code‑base approach, you can deliver a native‑looking checkout flow to both iOS and Android without duplicating effort. Moreover, PayPal’s SDKs support features like one‑tap payments, recurring subscriptions, and currency conversion, giving you flexibility that many other gateways lack.
Prerequisites and environment setup
Before you start coding, make sure you have the following items ready. Skipping any of these steps often leads to cryptic build errors later on.
- Flutter SDK ≥ 3.0 installed and a working development environment (Android Studio, VS Code, or IntelliJ).
- A PayPal Business Account so you can create REST API credentials (client ID and secret).
- For Android: minSdkVersion 21 and the latest
androidxlibraries. - For iOS: Xcode 13+ and a valid Apple Developer provisioning profile.
- Familiarity with dart:async and Flutter’s widget lifecycle, since payment handling often involves asynchronous callbacks.
Step‑by‑step Flutter PayPal Integration
The actual integration can be broken into three logical phases: preparing PayPal, adding the SDK to your project, and wiring up the UI. Following this order keeps the process linear and reduces the need for back‑and‑forth debugging.
Configure PayPal developer account
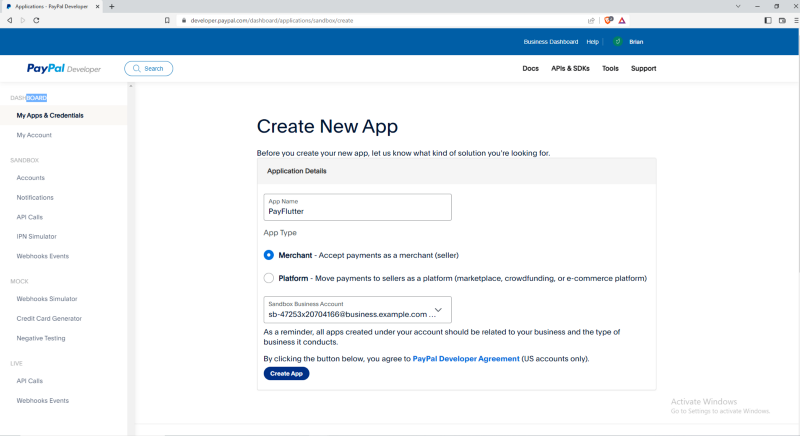
Log into PayPal Developer Dashboard and create an app under “My Apps & Credentials.” Choose “Sandbox” for initial testing, then note the generated client ID and secret. Remember to toggle the app to “Live” when you’re ready to ship, and replace the sandbox credentials accordingly.
Add SDK dependencies
Flutter does not ship an official PayPal package, so most developers rely on community plugins that wrap the native SDKs. A popular choice is flutter_braintree, which supports PayPal via Braintree’s gateway. Add the plugin to pubspec.yaml and run flutter pub get:
dependencies:flutter_braintree: ^2.0.0
On Android, update android/app/build.gradle to include the Braintree repository, and on iOS add use_frameworks! to the Podfile if it isn’t already there.
Implement the payment button
Now create a widget that launches the PayPal flow. The example below shows a minimal button that opens the native PayPal UI and returns a payment nonce.
import 'package:flutter_braintree/flutter_braintree.dart';class PayPalButton extends StatelessWidget {
final String token; // Braintree client token from your server
const PayPalButton({required this.token});
Future _startPayPal(BuildContext context) async {
var request = BraintreePayPalRequest(
amount: '9.99',
currencyCode: 'USD',
displayName: 'Your App Name',
);
try {
var result = await Braintree.requestPaypalNonce(
token,
request,
);
if (result != null) {
// Send result.nonce to your backend for verification
ScaffoldMessenger.of(context).showSnackBar(
SnackBar(content: Text('Payment successful!')),
);
}
} catch (e) {
ScaffoldMessenger.of(context).showSnackBar(
SnackBar(content: Text('Payment cancelled or failed.')),
);
}
}
@override
Widget build(BuildContext context) {
return ElevatedButton(
onPressed: () => _startPayPal(context),
child: Text('Pay with PayPal'),
);
}
}
Handling payment callbacks and verification
After the user authorizes the transaction, the SDK returns a nonce—a one‑time token that represents the payment. Your Flutter code should forward this nonce to a secure server endpoint, where you’ll exchange it for an actual transaction ID using PayPal’s REST API. Never verify the payment on the client; doing so opens the door to fraud.
On the server side, call /v2/checkout/orders/{order_id}/capture (sandbox or live endpoint based on the environment) with the client ID and secret encoded in a Basic Auth header. The response contains the transaction status, payer details, and a unique PayPal ID you can store for future reference.
Testing, debugging, and common pitfalls
Start with PayPal’s sandbox environment; it mimics real‑world flows without moving actual money. Use test accounts (buyer and seller) supplied by PayPal to simulate approvals, cancellations, and error states. If you encounter a “client token expired” error, double‑check that your server generates a fresh token for each request.
Another frequent hiccup is the mismatch between Android’s minSdkVersion and the Braintree library’s requirements. Raising the min SDK to 21 or higher usually resolves the build failure. On iOS, ensure you’ve added the NSAppleMusicUsageDescription key to Info.plist if you request Apple Pay alongside PayPal, as missing keys can cause the app to crash at launch.
Lastly, remember to test deep‑link handling. When PayPal redirects back to your app after a web‑based flow, the URL scheme must be correctly registered in both AndroidManifest.xml and the iOS URL Types section. Misconfigured schemes result in the user being stuck on a blank browser page.
FAQ
Can I use PayPal without Braintree?
Yes, you can call PayPal’s REST endpoints directly, but you’ll need to implement your own web‑view flow and handle tokenization yourself. The Braintree wrapper simplifies native UI and security, making it the preferred route for most Flutter developers.
Is it safe to store the PayPal client ID in the app?
The client ID is public by design; however, the secret must never appear in the client bundle. All server‑side calls that require the secret should run on a backend you control.
What currencies does the Flutter PayPal integration support?
PayPal supports over 100 currencies, but the Braintree SDK may limit you to those enabled for your merchant account. Check your PayPal dashboard to confirm which currencies are active for your business.
How do I handle recurring subscriptions?
For recurring billing you’ll need to create a Billing Agreement via PayPal’s Subscriptions API. The flow is similar to a one‑time payment, but after the initial approval PayPal will issue a subscription ID that you can store and use for future charge cycles.